

-
Products
Overview Products

-
2D Cutting
-
Tube Cutting
-
3D Cutting
-
Intelligent Welding
-
Intelligent Cutting Head
-
Industrial Automation
-
Industrial Software
-
Combination
-
Combination
BOCHU New Product -
Combination
BOCHU New Product -
Controller
BOCHU New Product -
2D Cutting Head
Tube Cutting Head
3D Cutting Head
Consumables
BOCHU New Product -
Servo
BOCHU New Product -
Industrial 4.0
-
- Support
- About
- Online Store


- Software Download
- Manual
- Video
- Tutorial
I. Introduction
When there are multiple part types during production making it difficult to distinguish in between, marking text on the part surface can help with sorting. If no marking text was drawn when creating the part, the text can be added directly in TubesT.
Starting from TubesT V1.25, the software supports batch adding text, placing the text at the tube’s front end and automatically avoiding inner holes.
Starting from TubesT V1.39, the software supports batch modifying of previously added text content and parameters.
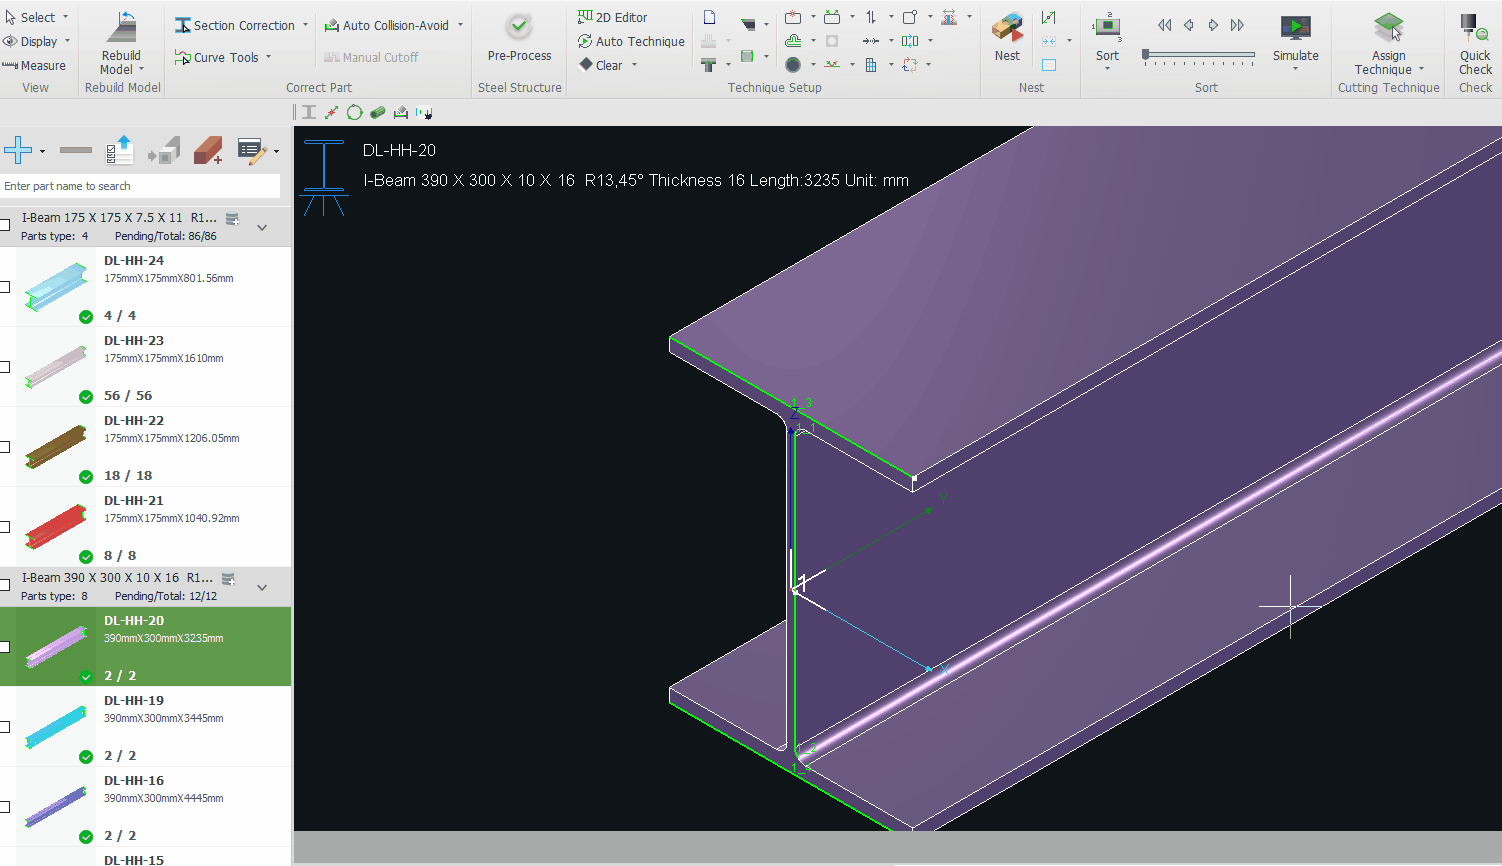
II. How to Use
1. Batch Add/Modify Texts
1. Click Batch Modify Parts above the part list to open the table.

2. Specify the text content and placement.

Text Content:If the part name itself is used as the marking text, simply copy and paste the entire column (Ctrl+C/Ctrl+V).
For convenience, it is recommended to name parts using the format “Quantity–Name–ID” during drawing. This format allows fast separation of quantity and text content using Excel’s “Text to Columns”.
A tip for using the Text-to-Columns tool is provided in: Extracting Quantity and Text Using Excel.
When modifying text, all changed cells will be highlighted in red, and the system will replace the original marking text accordingly.

Text Position:The marking position is determined by the Margin to left. In most cases, setting 10 mm is sufficient. If an hole exists at this location, the system automatically shifts the text to a valid nearby position.
If no valid location is found under current parameters, the software will show a prompt.
3. Edit Text

| Parameter | Description | Example |
| Font |
A variety of fonts are available with a preview shown in the black region.
Notice: Fonts with the *.shx extension are single-line fonts.
|
 |
| Height |
Marking text size. Adjust based on tube diameter—the larger the value, the larger the text. Notice: Tests show that 8 mm to 12 mm is sufficient for visibility and part distinction. |
 |
| Marking |
Enable if the text is for marking. Disable if cutting hollow characters. |
 |
| Rotate 90° |
When disabled, text is aligned along the Y-axis. When enabled, text is aligned along the X-axis. |
 |
| Explode Text |
Enable when bridge structures are needed for hollow-cut characters. For marking text, it is recommended to keep this option disabled. |
 |

4. After completing text content, position, and parameter settings, click Confirm.

2. Batch Delete Text
To remove previously added text, select the target parts and click Delete Text on Selected Parts in the Batch Modify Parts drop-down menu.
Tip: Use the Select buttons below the part list to perform Select All or Invert Selection.

V. FAQs
1. Can marking text be placed on a specific face?
-
-
H-Beams: Use Pre-Process to assign the marking text to a designated face.
-
Other profiles: The auto-placement algorithm currently determines the position randomly.
-
Notice: For channel sections, the system preferentially places text on the web. If the web is unavailable, it places it on the flange.
-
- To force placement at a specific location, use Add Text.
-
2. What should I do if auto add text fails?

If no valid placement location exists, the software will notify you and highlight the parts:

-
-
- Pink Highlight:
-
The text parameters do not meet marking requirements, and text is not added. For example, if the text length exceeds the part length, it cannot be marked.
-
Solutions:
-
Manually Add Text with a smaller height, or
-
Adjust parameters (e.g., reduce text height, toggle Rotate 90°) and re-import the part.
-
-
-
- Pink Highlight:
-
-
-
- Dark Blue Highlight:
-
Text was added, but the placement does not meet the required Margin to Left.
If acceptable, this can be ignored; otherwise remove the text and adjust the margin parameter, or use Add Text.
-
- Dark Blue Highlight:
-
3. How to configure marking parameters in the cutting software (FACut-H/TubePro)?
In TubesT, marking toolpaths are organized in a separate layer.
In TubePro, you can configure a dedicated technique for the marking layer.
For example, if the marking toolpath is assigned to Layer 2 (Blue), you need to configure Layer 2 in TubePro for marking parameters.
If you are unfamiliar with parameter tuning, refer to the following suggestions: increase Cutting speed and Nozzle height; lower Peak power and Duty cycle.

4. How to separate quantity, name, and ID from part names in the “Quantity–Name–ID” format?
Use Excel’s Text to Columns function to extract quantity and marking text content efficiently.
I. Introduction
When there are multiple part types during production making it difficult to distinguish in between, marking text on the part surface can help with sorting. If no marking text was drawn when creating the part, the text can be added directly in TubesT.
Starting from TubesT V1.25, the software supports batch adding text, placing the text at the tube’s front end and automatically avoiding inner holes.
Starting from TubesT V1.39, the software supports batch modifying of previously added text content and parameters.
II. How to Use
1. Batch Add/Modify Texts
1. Click Batch Modify Parts above the part list to open the table.
2. Specify the text content and placement.
Text Content:If the part name itself is used as the marking text, simply copy and paste the entire column (Ctrl+C/Ctrl+V).
For convenience, it is recommended to name parts using the format “Quantity–Name–ID” during drawing. This format allows fast separation of quantity and text content using Excel’s “Text to Columns”.
A tip for using the Text-to-Columns tool is provided in: Extracting Quantity and Text Using Excel.
When modifying text, all changed cells will be highlighted in red, and the system will replace the original marking text accordingly.
Text Position:The marking position is determined by the Margin to left. In most cases, setting 10 mm is sufficient. If an hole exists at this location, the system automatically shifts the text to a valid nearby position.
If no valid location is found under current parameters, the software will show a prompt.
3. Edit Text
| Parameter | Description | Example |
| Font |
A variety of fonts are available with a preview shown in the black region.
Notice: Fonts with the *.shx extension are single-line fonts.
|
|
| Height |
Marking text size. Adjust based on tube diameter—the larger the value, the larger the text. Notice: Tests show that 8 mm to 12 mm is sufficient for visibility and part distinction. |
|
| Marking |
Enable if the text is for marking. Disable if cutting hollow characters. |
|
| Rotate 90° |
When disabled, text is aligned along the Y-axis. When enabled, text is aligned along the X-axis. |
|
| Explode Text |
Enable when bridge structures are needed for hollow-cut characters. For marking text, it is recommended to keep this option disabled. |
|
4. After completing text content, position, and parameter settings, click Confirm.
2. Batch Delete Text
To remove previously added text, select the target parts and click Delete Text on Selected Parts in the Batch Modify Parts drop-down menu.
Tip: Use the Select buttons below the part list to perform Select All or Invert Selection.
V. FAQs
1. Can marking text be placed on a specific face?
-
-
H-Beams: Use Pre-Process to assign the marking text to a designated face.
-
Other profiles: The auto-placement algorithm currently determines the position randomly.
-
Notice: For channel sections, the system preferentially places text on the web. If the web is unavailable, it places it on the flange.
-
- To force placement at a specific location, use Add Text.
-
2. What should I do if auto add text fails?
If no valid placement location exists, the software will notify you and highlight the parts:
-
-
- Pink Highlight:
-
The text parameters do not meet marking requirements, and text is not added. For example, if the text length exceeds the part length, it cannot be marked.
-
Solutions:
-
Manually Add Text with a smaller height, or
-
Adjust parameters (e.g., reduce text height, toggle Rotate 90°) and re-import the part.
-
-
-
- Pink Highlight:
-
-
-
- Dark Blue Highlight:
-
Text was added, but the placement does not meet the required Margin to Left.
If acceptable, this can be ignored; otherwise remove the text and adjust the margin parameter, or use Add Text.
-
- Dark Blue Highlight:
-
3. How to configure marking parameters in the cutting software (FACut-H/TubePro)?
In TubesT, marking toolpaths are organized in a separate layer.
In TubePro, you can configure a dedicated technique for the marking layer.
For example, if the marking toolpath is assigned to Layer 2 (Blue), you need to configure Layer 2 in TubePro for marking parameters.
If you are unfamiliar with parameter tuning, refer to the following suggestions: increase Cutting speed and Nozzle height; lower Peak power and Duty cycle.
4. How to separate quantity, name, and ID from part names in the “Quantity–Name–ID” format?
Use Excel’s Text to Columns function to extract quantity and marking text content efficiently.

