

-
Products
Overview Products

-
2D Cutting
-
Tube Cutting
-
3D Cutting
-
Intelligent Welding
-
Intelligent Cutting Head
-
Industrial Automation
-
Industrial Software
-
Combination
Controller
-
Combination
BOCHU New Product -
Combination
BOCHU New Product -
Controller
BOCHU New Product -
2D Cutting Head
Tube Cutting Head
3D Cutting Head
BOCHU New Product -
BOCHU New Product
-
- Support
- About
- Online Store


- Software Download
- Manual
- Video
- Tutorial
In SmartDraw, the common drawing tools are points, lines, circles, arcs, and templates.
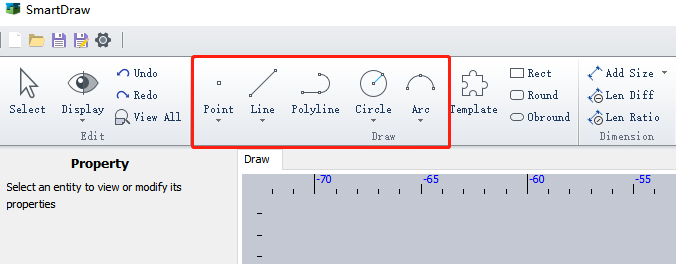
Template is to store fixed shapes and graphics that can be customized. Please refer to 'Smart Draw-Template' for more information."
1.Line
Smart Draw has three types of lines: normal line, parallel line to a given line, and perpendicular line to a given line.
1.1 Normal Line
- Activate the "line" command and click on any two points, or drag to draw a line directly.
- Hold down the "shift" key to draw a line with "horizontal", "vertical", or "45-degree fixed slope" constraints.
- When one endpoint of the line snaps to an existing shape, a "merge" or "coincide" constraint relationship will be automatically generated.
1.2 Parallel Line
- After activating the "parallel line" command, you must first select an existing line before drawing a new line.
- The drawn line will automatically be constrained to be parallel to the selected line.
1.3 Perpendicular Line
Follows the same process as drawing a parallel line.
2.Circle
Smar Draw has three ways to draw circles: normal circle, 3-point circle, and circle with equal radius.
2.1 Normal Circle
Click the Circle button and click on any two points, or drag to specify the center and radius of the circle.
When drawing, both the center and radius points can snap to existing shapes. Depending on the relationship with the snapped shape, automatically add "merge", "coincide", or "tangent" constraints to the circle.
2.2 3-Point Circle
Activate the 3-Point Circle command and select three non-collinear points on the circumference of the circle to generate a circle.
The circle with three points can be used to easily draw shapes like this:
2.3 Equal Circle
Equal circle is a circle with a equal radius with another circle.
- Activate the "Equal Circle" command and select an existing circle or line. If a line is selected, the radius of the circle will be equal to the length of the line.
- The circle will automatically be constrained to have an equal radius to the selected circle, forming an "equal" constraint.
3.Point
Smart Draw offers three ways to draw points: normal point, midpoint, and cross point.
3.1 Normal Point
Activate the "point" command and click on any location to generate a point.
3.2 Midpoint
Activate the "midpoint" command and click on a line or arc to automatically generate the midpoint of the line or arc (with a "midpoint" constraint).
3.3 Cross Point
Activate the "Cross point" command and click on any two shapes to automatically generate all intersection points between the two shapes (with a "coincide" constraint).
4.Arc
Smart Draw has three ways to draw arcs: 3-point arc, scan arc, and tangent arc.
4.1 3-Piont Arc
- Activate the "Arc" command and click on any three points to generate an arc.
- The first two points are the starting point and midpoint of the arc, and the third point determines the direction and radius of the arc.
4.2 Scan Arc
- Activate the "scan arc" command and click on any three points to generate an arc.
- The first point is the center of the arc, the second point is the starting point of the arc (determining the radius at the same time), and the third point is the endpoint of the arc.
- Currently, arcs can only be drawn in a counterclockwise direction from the starting point to the endpoint.
4.3 Tangent Arc
- Activate the "tangent arc" command and select an endpoint of a line or arc as the first point. The second and third points determine the position and direction of the arc.
- The generated arc will automatically be tangent to the selected line or arc, forming a "tangent" constraint.
Tips
- Pressing "Shift" allows you to select multiple shapes at once.
- To deselect, click on a blank area, press the "ESC" key, or click on the "Select" button.
- Clicking on a shape will display all relevant information about the shape in the left information panel.
- Selected shapes can be set as "structure line" in the left information panel, which are used for geometric and dimensional constraints and do not generate extrusion features.
- Right-clicking on a shape allows you to copy and paste it.
- When selecting shapes by dragging a selection box, shapes are selected only if they are fully enclosed by the box when selected from left to right, or even partially enclosed when selected from right to left.
- If you select an arc or a line, its endpoints will not be selected together. If needed, select them separately.
In SmartDraw, the common drawing tools are points, lines, circles, arcs, and templates.
Template is to store fixed shapes and graphics that can be customized. Please refer to 'Smart Draw-Template' for more information."
1.Line
Smart Draw has three types of lines: normal line, parallel line to a given line, and perpendicular line to a given line.
1.1 Normal Line
- Activate the "line" command and click on any two points, or drag to draw a line directly.
- Hold down the "shift" key to draw a line with "horizontal", "vertical", or "45-degree fixed slope" constraints.
- When one endpoint of the line snaps to an existing shape, a "merge" or "coincide" constraint relationship will be automatically generated.
1.2 Parallel Line
- After activating the "parallel line" command, you must first select an existing line before drawing a new line.
- The drawn line will automatically be constrained to be parallel to the selected line.
1.3 Perpendicular Line
Follows the same process as drawing a parallel line.
2.Circle
Smar Draw has three ways to draw circles: normal circle, 3-point circle, and circle with equal radius.
2.1 Normal Circle
Click the Circle button and click on any two points, or drag to specify the center and radius of the circle.
When drawing, both the center and radius points can snap to existing shapes. Depending on the relationship with the snapped shape, automatically add "merge", "coincide", or "tangent" constraints to the circle.
2.2 3-Point Circle
Activate the 3-Point Circle command and select three non-collinear points on the circumference of the circle to generate a circle.
The circle with three points can be used to easily draw shapes like this:
2.3 Equal Circle
Equal circle is a circle with a equal radius with another circle.
- Activate the "Equal Circle" command and select an existing circle or line. If a line is selected, the radius of the circle will be equal to the length of the line.
- The circle will automatically be constrained to have an equal radius to the selected circle, forming an "equal" constraint.
3.Point
Smart Draw offers three ways to draw points: normal point, midpoint, and cross point.
3.1 Normal Point
Activate the "point" command and click on any location to generate a point.
3.2 Midpoint
Activate the "midpoint" command and click on a line or arc to automatically generate the midpoint of the line or arc (with a "midpoint" constraint).
3.3 Cross Point
Activate the "Cross point" command and click on any two shapes to automatically generate all intersection points between the two shapes (with a "coincide" constraint).
4.Arc
Smart Draw has three ways to draw arcs: 3-point arc, scan arc, and tangent arc.
4.1 3-Piont Arc
- Activate the "Arc" command and click on any three points to generate an arc.
- The first two points are the starting point and midpoint of the arc, and the third point determines the direction and radius of the arc.
4.2 Scan Arc
- Activate the "scan arc" command and click on any three points to generate an arc.
- The first point is the center of the arc, the second point is the starting point of the arc (determining the radius at the same time), and the third point is the endpoint of the arc.
- Currently, arcs can only be drawn in a counterclockwise direction from the starting point to the endpoint.
4.3 Tangent Arc
- Activate the "tangent arc" command and select an endpoint of a line or arc as the first point. The second and third points determine the position and direction of the arc.
- The generated arc will automatically be tangent to the selected line or arc, forming a "tangent" constraint.
Tips
- Pressing "Shift" allows you to select multiple shapes at once.
- To deselect, click on a blank area, press the "ESC" key, or click on the "Select" button.
- Clicking on a shape will display all relevant information about the shape in the left information panel.
- Selected shapes can be set as "structure line" in the left information panel, which are used for geometric and dimensional constraints and do not generate extrusion features.
- Right-clicking on a shape allows you to copy and paste it.
- When selecting shapes by dragging a selection box, shapes are selected only if they are fully enclosed by the box when selected from left to right, or even partially enclosed when selected from right to left.
- If you select an arc or a line, its endpoints will not be selected together. If needed, select them separately.


