

-
Products
Overview Products

-
2D Cutting
-
Tube Cutting
-
3D Cutting
-
Intelligent Welding
-
Intelligent Cutting Head
-
Industrial Automation
-
Industrial Software
-
Combination
-
Combination
BOCHU New Product -
Combination
BOCHU New Product -
Controller
BOCHU New Product -
2D Cutting Head
Tube Cutting Head
3D Cutting Head
Consumables
BOCHU New Product -
Servo
BOCHU New Product -
Industrial 4.0
-
- Support
- About
- Online Store


- Software Download
- Manual
- Tutorial
Problem Description
There may be burns on parts end near the section in actual production, for example:
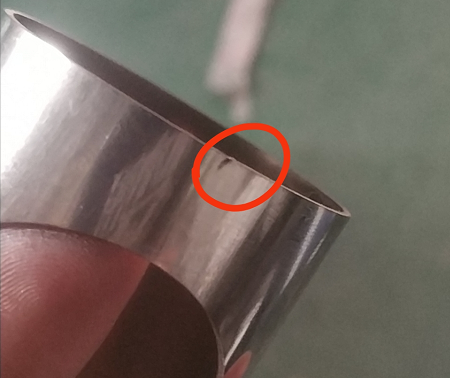
As shown in the picture, the burn occurs near right cut-off line, which means the laser beam burns it during part’s falling when the last cutting path is finished. According to the factors above, we provide three methods to solve it.
- Adjust Slow Stop Parameters
In TubePro, Layer, you can enable Slow Stop process to set specific cutting parameters for cutting path near the part end.
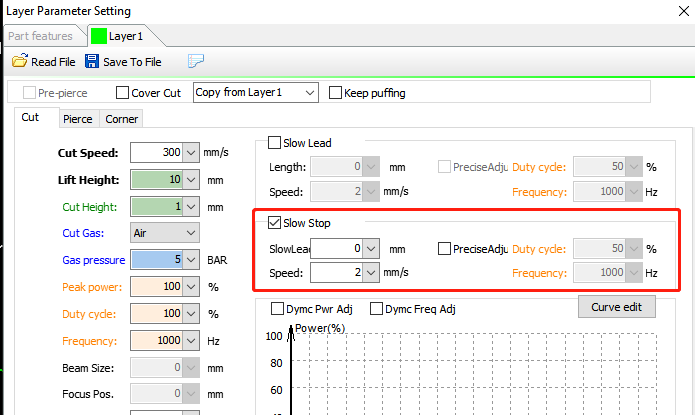
Slow Lead: The distance applied this special parameters.
Speed: Cutting speed for this section.
Precise Adjust: Enable it to adjust Duty Cycle and Frequency for this section of cutting path.
- Add Leadouts
You’re allowed to apply Leadouts Process on right cut-off line of the parts, but if the parts are Co-Edged during the nesting, Leadouts process will get invalidated on co-edged cut-off lines, you’d better try other methods to solve the burns.
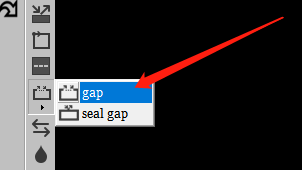
- Add Gap
You can also add proper Gap on the cut-off line to get this effect eased.
- Adjust Cutting Parameters
Modify the Power Curve in Layer Parameters appropriately, for example, you can lower the laser power when the machine is at a relative low speed of cutting.
Comparison

(Leadouts applied on the right part)
(Slow Stop applied on the left part)
Problem Description
There may be burns on parts end near the section in actual production, for example:
As shown in the picture, the burn occurs near right cut-off line, which means the laser beam burns it during part’s falling when the last cutting path is finished. According to the factors above, we provide three methods to solve it.
- Adjust Slow Stop Parameters
In TubePro, Layer, you can enable Slow Stop process to set specific cutting parameters for cutting path near the part end.
Slow Lead: The distance applied this special parameters.
Speed: Cutting speed for this section.
Precise Adjust: Enable it to adjust Duty Cycle and Frequency for this section of cutting path.
- Add Leadouts
You’re allowed to apply Leadouts Process on right cut-off line of the parts, but if the parts are Co-Edged during the nesting, Leadouts process will get invalidated on co-edged cut-off lines, you’d better try other methods to solve the burns.
- Add Gap
You can also add proper Gap on the cut-off line to get this effect eased.
- Adjust Cutting Parameters
Modify the Power Curve in Layer Parameters appropriately, for example, you can lower the laser power when the machine is at a relative low speed of cutting.
Comparison
(Leadouts applied on the right part)
(Slow Stop applied on the left part)

